SABRE/MAGNA FAQ(v1.2 February 1999) |
Many thanks to Trenton Schoeb for his work in compiling this FAQ.
SabMag mailing list commands (including how to subscribe)
SabMag East mailing list commands (including how to subscribe).
(Mailing list for eastern SabMag members. SME get-together info and other area-specific stuff.)
DIFFERENCES
MANUALS, ERRORS/OMISSIONS/EXCEPTIONS
OIL OIL PRESSURE, CHECKING PERFORMANCE STATISTICS TEMPERATURE GAUGE TOOLS VALVE CLEARANCE ADJUSTMENTCoveted out-of-production accessory for Magnas. Adjustable in forward/backward direction on rails that mount alongside the grip rails and are attached by the upper shock mount bolt and the bolts through the underside of the fender into the grip rails (Magnas). Used parts dealers or private purchase.
Posts favorable to the following were received.
(1)PIAA Corp.
15370 SW Millikan Way
Beaverton, OR 97006
800-525-7422
fax 503-643-9144
Call for free catalog.
A Web vendor: http://www.weathers.com:80/piaa.html.
For a pic of the lamps mounted on an ST1100, using IB veteran Ron Major's brackets:
http://www.whidbey.net:80/~dwilson/moto/piaa.html
(2) Motolight, Inc.
1137 Fort View
Cincinnati, OH 45202
513-721-2110
From a list member: "Two small teardrop halogen fixtures, mount on lower fork legs, 35w apiece; $245.00 plus shipping, 1 year warranty on everything including the bulbs. ...incredible amount of light...great... in conjunction with either your low beam or high beam...terrific...in low visibility situations...first rate quality...complete with all wiring needed and an on/off switch...Installation is very easy."
Chaparral carries some "Accents and Accessories for the Honda Magna." See
http://www.chaparral-cycle.com/touring/magna/accents.html for:
Dimensional radiator grille (V65 83-86)
Embossed dimensional emblems
Eagle design (V45 & VF700)
Wing design (V45 & V65)
Chrome kickstand (Magnas 82-86)
Master cylinder cover sets (V65 85-86, V45 83-84)
Nameplate cover (V45 82-83, VF700 84-86)
Air cleaner cover sets (V45 82-83, VF700 84-86 except CA)
Taillight grille (V65 83-86)
SAFETY
The following are recommended:
(1) SOS Pulsar headlight modulator
Sound Off Safety Inc.
Box 206
Hudsonville, MI 49426
616-669-0232
(2) Starburst headlight modulator (single channel)
Kriss Industries Inc.
P.O.BOX 35331
Tucson, AZ 85740
520-629-8800
fax 520-622-5995
(1) The Hyperlite is recommended by two list members.
Hyperlite auxiliary brake light flasher system
M & G Accessories, Inc.
Marie & Gary Chatham
10104 Old Creedmoor Rd.
Raleigh, N.C. 27613
(919)847-6819
mailto:mgacc@ibm.net
"Developed for BMWs but easily adapted to other bikes... consists of 16 small, very bright red LED's mounted in two 1"x1"x 3/4" units (approx), 8 LED's per unit. They are mounted on any flat rear surface that allows them to be aimed straight behind you. When you apply your brakes, the Hyperlites flash very rapidly. ...I have them mounted on either side of my taillight."
Hyperlite installation notes (V65 Magna): Remove the seat and toolbox. Loosen one grip rail. Remove the other grip rail and remove the phillips head screw attaching the plastic trim underneath to the frame.
Remove the two nuts attaching the taillight assembly to the fender. Remove the taillight assembly. Place the Hyperlite flashers on the outside, one on either side; run the wires inside and just leave the lights hanging for the moment. Replace the taillight so the wires pass through the small spaces on either side of the taillight assembly. Reassemble everything but the toolbox and seat. Connect the wires according to the instructions and test the lights. Peel and stick the lights to the sides of the taillight lens.
(2) Priority Lites: turns rear signals into running lights that flash when you hit the brakes, around $35 - $40. MO houses.
Priority Plus: as Priority Lites, and adds flashing brake light, around $65 - $70. MO houses.
Hotshot Modulator: similar to Priority Plus, around $120.
Since space under the seat is at a premium on Sab/Mags, you might have a little trouble figuring out where to put Priority Lites and Hotshot control modules. It can be done, though; one list member has a Hotshot on his V65 Magna.
DIY. At an auto supply store, obtain turn signal sockets that are built for running lights, like the ones that come on the front of your bike. The socket is the part that actually holds the bulb. It will have 3 wires: ground, running light, and signal light. Remove the rear 2 wire sockets and install the 3 wire sockets. Connect the ground and turn signal wires to the existing corresponding wires. Connect the running light wire to the same power source as the front running lights. Install 1034 dual filament bulbs. Viola, rear running lights.
We have a favorable report on the following vendor of high visibility vests and stick-on products for your bike, luggage, or helmet:
Conspicuity
P.O. Box 608
Elgin, IL 60121
(708) 697-4550
Solutions:
The calipers have 2 single pistons; that is, there are 2 pistons that press on the outside pads, whereas the inside pads are held against the caliper body. Therefore, the caliper body is mounted on sliders or pivots to allow side to side movement. The pivot pins and sleeves often have not received proper maintenance and are corroded, sometimes to the point of being frozen. This can result in the inside pads wearing rapidly, and even eating up the (very expensive) rotor ($360 list for a rear one). The pins and sleeves should be cleaned up with a wire brush or emery cloth and lubricated with high temperature silicone grease. If they are badly pitted they should be replaced, as they might eat into the aluminum of the caliper. The protective rubber boots should be inspected for cracks and tears and replaced if damaged. Pivots should be inspected periodically and cleaned and lubricated if necessary.
The Honda shop manual doesn't specify the torque for the caliper bolt (the one that goes through the pivot collar or sleeve).
Solutions:
The pistons are likely to be hard to get out, but can be removed without special tools. After detaching the caliper from the bike but before disconnecting the brake line, remove the pads and put a piece of wood 1/2" or 3/4" thick in the caliper, so the pistons won't come all the way out. Using the brake lever, pump both pistons out until they are stopped by the wood. Chances are you can then pull them both out. (Don't use pliers or anything that could burr or distort the pistons.) If necessary, put in a thinner piece of wood and repeat, or, if one is stubborn and one loose, block just the loose one till the stuck one comes out. Remove the seals and clean any crud out of the inside of the caliper using a small wire brush, steel wool, fine emery cloth, etc. and brake fluid, then wash with hot soapy water, rinse, and dry thoroughly with a hair dryer or compressed air. Unless you really know what you're doing, you probably shouldn't use a hone. The caliper body is aluminum & it would be too easy to overdo it. If you do use a hone, be very careful to remove only the crud, not any metal. Be sure to get any crud out of the seal grooves. (You can make a little scraper out of something like brazing rod for this.) Clean up the pistons with hot soapy water or brake fluid and a brush or nylon dish scrubber or the like. Don't use coarse abrasives on stubborn deposits or superficial corrosion; use crocus cloth or very fine wet-or-dry paper such as 1000 grit with water or brake fluid. The pistons are hard chromed and polished, and if there is deterioration of the surface that cannot be readily polished out, they should be replaced. Lightly lubricate the new seals and the pistons with silicone brake grease and reassemble.
After replacing the calipers, bleed the system until clean fluid with no air comes out. If done as described in the manual, you may need to also bleed at the joints of the tee on the front, and you may have to crack the banjo bolt on the master cylinder as well. Drape old towels all over to catch spilled fluid. A MityVac vacuum brake bleeder is nicer, available at auto supply stores or from
Check the hoses for cracks. It's rare for one to fail, but they are after all 10 years or more old. Consider replacing them with braided stainless lines, which can improve brake feel because they swell less under pressure. These are available in kit form from Russell, or you can buy components and make up your own. The Russell ones cost about the same as factory replacements, around $165. One thing about these: you occasionally get one with a banjo fitting that doesn't quite line up, putting a twist in the line. Braided lines don't like this, so it should be returned for one that fits correctly. See PARTS and/or CAMS below for sources of hose and fittings to make your own; list members report good results using AN-3 line and appropriate fittings. (Apparently there is a wide variety of bends and angles for the banjo bolt fittings when you use #3 line.) Another alternative is to take the old lines to a hydraulic equipment supplier that handles the necessary components and have them make up a set.
Motorcycle Accessory Warehouse lists Russell brake lines for SabMags:
While you're doing the calipers consider installing a master cylinder kit. If the bore of the master cylinder is badly pitted, replace the master cylinder. If it is only lightly pitted or glazed, hone the bore with a brake hone lubricated with brake fluid. Flush thoroughly with brake fluid, or wash with hot soapy water, rinse, and dry thoroughly. Make sure to get any crud out of the hole in the bottom of the reservoir. Reassemble. Prime by partially filling the reservoir and pumping the lever with a finger over the banjo bolt hole until mostly bubble-free fluid comes out around your finger. Reconnect the lines and bleed at the calipers. Turn the handlebars lock to lock and tap the master cylinder with a rubber mallet to free up any last stubborn bubbles, then bleed again to remove them. In especially stubborn cases, you might have to take the master cylinder off the handlebar and hold it vertically and rap it. If all the air is out of the system and the lever still feels mushy or moves slowly under pressure, the master cylinder needs to be repaired or placed. (MCN 9/96 p. 9; Rider 10/96 pp. 70-71.)
REAR MASTER CYLINDER PUSHROD PIN
This can be a bitch to get out. Try depressing the brake pedal as far as it will go. This positions the pin into a spot where there is a little more room. The lower you can press the pedal the better. The pin will hit the exhaust collector just before it clears the spline from the brake pedal. You may be able to remove it by pushing the pin up towards the top of the collector and working it out. An easier method is to loosen the front nut of the two nuts by the push rod bracket that accepts the brake pedal pin and unscrewing the rod from the bracket.
Brake (and clutch) fluid should be changed periodically, since it is very hygroscopic and inevitably absorbs water, which contributes to corrosion in the system. Intervals? Yearly, at least in moist climates; every 2 years may be OK in dry areas. DOT 4 fluid is required. It has higher wet and dry boiling points than DOT 3, which is also glycol based. DOT 5 is silicone based and is not compatible with the systems on Sabres and Magnas.
Honda OEM and EBC greens are given favorable reports. EBC blacks are less well liked, being rated by two list members as OK but inferior to OEM. No reports on SBS or other brands.
Information from one list member on Galfer:
Galfer-USA (galfer@silcom.com or 800-685-6633)
They said it was $95 for any custom lines. They had them to us next day (they are only about 55 miles from the house so it was quicker than you East-coasters can expect).
Sandro quoted me $85 for a two-line kit, and $42.50 for the single line one on the rear.
All banjo fittings seem to have about a 20-25 degree bend to them at
both the master cylinder and caliper ends; I'll have to get the exact degrees
to request from Sandro tomorrow. He'll stick a "Y" banjo fitting at the
front master cylinder for the 2-line conversion.
Front left line: 45.5 inches
Front right line: 48.5 inches
Rear line: 18 inches
These measurements are for the hoses themselves, and do not include the banjo fittings. Be careful to specify this, as someone might assume you're including the banjo bolts and take off a couple inches. All banjo fittings have a *12* degree bend to them at both the master cylinder and caliper ends, not a 20 degree bend as I guessed.
He'll stick a *double* banjo fitting at the front master cylinder for the 2-line conversion, instead of a "Y" fitting as I thought. Turnaround time is one day from when you give him your order. They can't process a phone credit card order, so they usually ship next-day UPS COD.
We recommend that you verify the oil pressure after doing an oil mod, since a few instances of low oil pressure after a mod are reported. (See OIL PRESSURE.)
Dale Walker's Holeshot (408-761-2808) lists a V4 oil mod for $289.00, which brings oil from the oil filter adapter to the heads. Holeshot's web page
Review and installation of Holeshot kit.
Amol Motorcycles in NJ (201-384-1103) used to offer a similar mod and maybe still does. (See OIL).
Why not just tee off of the oil pressure switch?
Other list members have made pressure measurements at this engine point and have concluded that the pressure and volume is not sufficient to solve the oiling problem.
CAM CHAINS AND CAM CHAIN TENSIONERS, REPLACING
It is not necessary to remove the cams for this, nor is it necessary to remove the engine from the frame. Changing cam chains is a bitch unless you use master link type chains, because you have to tear the engine down to the crank, and the engine/tranny of a V65 weighs around 200 lb. This is described in an article on the above web site.
[Does anyone know of a source of master link type cam chains? DID?]
See http://www.island.net/~areitsma/ for information on Shadbolt Cams in Vancouver, BC, Canada. They have experience with V4 cam regrinding, and custom grinds are available.
Cams reground by Megacycle are available from Dale Walker's Holeshot (408-761-2808). Cams are $466 for four + $47 per follower, exchange required.
In these carbs there are two fuel systems for controlling the fuel/air mixture at low and high engine speeds. The low speed system consists of the starter jet, the slow jet, the air jet, and the pilot screw. In the carb throat on the airbox side of the throttle butterfly is the opening of the air jet. This feeds air into the low speed system to help atomize the fuel as it exits the jet openings. These are located in the throat just under the edge of the butterfly in the fully closed position. The one just at the edge of the butterfly is the bypass hole and is the opening of the starter jet. The other 3, located slightly on the engine side, are for the slow jet and the enrichener circuit ("choke").
The pilot screw controls the flow of air from the air jet and is used to adjust the idle mixture. At idle, a tiny amount of air passes around the butterfly and draws fuel from the bypass hole. At modest butterfly openings, up to 1/4 throttle or so, the incoming air draws more fuel from the low speed system, with the slow jet providing a larger proportion of the fuel as the throttle is opened.
As the throttle is opened further and engine speed increases, the high speed system comes on line. This consists of the main jet, the vacuum piston or slide, and the jet needle, which is held in the slide with the pointed end in the main jet. When the slide is all the way down, the fat part of the needle mostly closes off the flow of fuel from the main jet. The slide doesn't quite completely occlude the carb throat, allowing a small opening for the mix to flow through at low throttle.
As the throttle is opened, the slide at first is held down by its spring. As engine speed increases, the velocity of the flow of air under the slide and across the air lift hole increases, creating an increasing vacuum in the space above the diaphragm. The amount of vacuum controls the height of the slide, which controls the position of the needle and thus the amount of fuel entering the mix from the main jet. When engine speed is high enough the slide is lifted all the way up and the flow of both air and fuel are at maximum. Thus, above about 1/4 throttle it is the slide that controls delivery of the mix to the engine; the butterfly controls it only indirectly. At WOT the low speed system is still delivering fuel, but its contribution becomes proportionally smaller as speed increases. (Shoemark P., Motorcycle Carburettor Manual, Haynes Publishing Group, Newbury Park, CA, 1981; ISBN 0-85696-603-7)
Neither the Clymer nor Honda manual goes into enough detail about getting the carbs out of and back into the connectors. Follow the instructions in either manual, with the following additions. This is based on a V65 Magna, but should be generally applicable to others.
Removal:
There are a couple of approaches here. The basic or minimum-diassasembly method is recommended in the Clymer manual, which says that if you need to separate the carbs you should take them to the dealer. OTOH a complete rebuild, with a thorough cleaning by immersion in carburetor cleaner and such things as proper lubrication of the felt throttle shaft lubrication rings and replacement of fuel joint and air joint O-rings, requires complete disassembly. The Honda manual provides instructions. However, basic inspection and cleaning can be done without separating the carbs. If you do take them apart, eyeball the initial balance by lining up the throttle plates with the bypass holes before reinstalling them.
Do you need 4 $30 rebuild kits? Unless you have to replace parts, this also is your call. Many list members have re-used parts like float valves and bowl gaskets successfully.
According to a Honda America employee:
"Don't put silicone anywhere on a carburetor. A very light coating of Gaskacinch (the Japanese equivalent of what is used at the factory) works good. If the gasket appears limp, or if injudicious use of carb cleaner has made it swell and become difficult to glue down, drop it in a container of hot soapy water for several minutes to normalize it. Then lightly coat it with Gaskacinch, let dry, and very lightly coat the bowl groove, and let dry, and put them together."
Note that the Honda manual says to remove the starter jet. The starter jet is removable only on some Sabres & Magnas; on others it is pressed in. There appears to be no particular pattern to this. If it doesn't have a screwdriver slot or hex on it, take the hint. Otherwise just follow either manual. If you have a vernier caliper of the kind where the sliding part sticks out of the butt end when you open it up, the sticking out part makes a pretty decent float level gauge. Make sure carb cleaner or WD-40 blown into all the appropriate orifices comes out the holes in the carburetor throat, and don't forget the air jet orifice upstream from the butterfly. (Be careful not to get carb cleaner in your eyes.)
There is something of a controversy regarding use of wire to clean jets, and technical columns in magazines don't agree on this, either. OTOH there are times when there's something in there so stubborn that only a good stiff wire will get it out. The key thing is to not damage the orifices, so it would be best to use a carb cleaning tool, which has smoothly ridged wires of various sizes. They are available by MO from various sources, and similar if not identical tools are sold by welding supply stores for cleaning the tips of oxyacetylene torches.
One thing you must do: keep the parts from the different carbs separate; some of them are not the same. Large numbered zip lock freezer bags work well for this. One list member recommends replacing "all those worthless phillips head screws" with corrosion proof allen head screws--on the bowls, top plates, and especially on the airbox. See PARTS for sources of such items.
This is pretty straightforward; you mostly just follow the manual and the instructions that come with your synch tool. A big floor fan blowing on the radiator helps keep the coolant temp down while you're working, or if you have a fanstat bypass switch installed turning it on also helps. If you've had the carbs apart, eyeball the initial balance by lining up the throttle plates with the bypass holes before reinstalling them.
Mercury tools are inexpensive and never need adjustment, but mercury is poisonous and environmentally incorrect. If you're not careful the mercury can get sucked into the engine. It won't hurt the engine, and the instructions that come with the tool should explain how to purge it. Dial gauges don't contain mercury, but good ones are expensive.
You have to have some sort of angle drive tool to turn the synch screws. The Honda tool shown in the manual lists for around $60.
Alternatives:
There are a couple of common situations where some tuning may be needed.
| '83 VF1100C V65 Magna | |
| Model Year | 1983 |
| V.I.N. | JH2SC120XDM000029- |
| Engine | SC12E-2000039- |
| Product Code | MB4 |
| Color | Pearl Siren Blue or Candy Maroon |
| Cast wheels with "Star" shaped design, headlight
shel, instruments & Fr
Fender are chrome '83-'86, speed nos. in increments of 10 ending with "0s" '83-'84, Fiber optics integrated lock anti-theft system '83-'85. |
| '84 VF1100C V65 Magna | |
| Model Year | 1984 |
| V.I.N. | 49 State - 1HFSC1204EA100001-
California - 1HFSC1219EA100004- |
| Engine | 49 State - SC12E-2100001-
California - SC12E-2102298- |
| Product Code | MB4 |
| Color | Black or Candy Andromeda Red |
| California model designation is VF1100CL'84, Cast wheels with straight spoke design '84-'86. |
| VF1100C'85 V65 Magna | |
| Model Year | 1985 |
| V.I.N. | 49 State - 1HFSC1209FA200001-
California - 1HFSC1218FA200001- |
| Engine | 49 State - SC12E-2200001-
California - SC12E-2200001- |
| Product Code | MB4 |
| Color | Black or Pearl Vintage Red |
| California model designation is VF1100CL'85, Speed Nos in increments of 10 ending with "5's" '85-'86, Control levers with screw-type adjusters '85-'86, Push-to-cancel turnsignals switch '85-'86 |
| VF1100C'86 V65 Magna | |
| Model Year | 1986 |
| V.I.N. | 49 State - 1HFSC1203GA300001-
California - 1HFSC1212GA300001- |
| Engine | 49 State - SC12E-2300001-
California - SC12E-2300001- |
| Product Code | MB4 |
| Color | Black or Candy Glory Red |
| California model designation is VF1100CL'86,
Engine Side Cases are polished,
Side stand is chrome plated, FR & RR brake discs with inner cut-offs, Fiber optics integrated lock anti-theft system deleted. |
| VF1100S'84 V65 Sabre | |
| Model Year | 1984 |
| V.I.N. | 49 State - 1HFSC1707EA000001- California - 1HFSC1716EA000001- |
| Engine | 49 State - SC17E-2000001- California - SC17E-2000001- |
| Product Code | MB3 |
| Color | Black/Pleiades Silver Metallic/Red or Black/Maroon/Silver |
| California model designation is VF1100SL'84, Black/Silver unit has red stripe, Black/Maroon unit has silver stripe, Speed Nos in increments of 10 ending with "0's", |
| VF1100S'85 V65 Sabre | |
| Model Year | 1985 |
| V.I.N. | 49 State - 1HFSC1701FA100001- California - 1HFSC1710FA100001- |
| Engine | 49 State - SC17E-2100001- California - SC17E-2100001- |
| Product Code | MB3 |
| Color | Black/Monte Rosa Silver Metallic/Red or Black/Monterosa Silver Metallic/Blue |
| California model designation is VF1100SL'85, Color variations (red & Blue) are stripes only, Speed Nos in increments of 10 ending with "5's" |
One SabMag list member reports the following data (measured from the underside of the handle to the "full" mark):
1984 V65 Sabre - 152mm (one data point)
1984-85 V65 Magna - 157-158mm (three data points)
V45 Magna - 147mm (two data points)
Two books that are helpful for understanding how the electrical and ignition systems work, and therefore make troubleshooting easier, are
ALTERNATOR
There are a lot of SabMag posts related to ignition problems. The troubleshooting guide in the Honda manual is OK, but it doesn't explain how the system works. The following simplified explanation is adapted from Tranter.
The SabMag ignition system is frequently referred to as a capacitor discharge (CDI) system, but it is actually a more advanced transistorized system. Basically, there are two separate systems, one for cylinders 1 & 3 and one for cylinders 2 & 4, as diagrammed in the manual, with the major components of each being the pulse generator, spark unit, and ignition coil. Base timing is determined by the position of a protrusion on the starter clutch. (In the Honda manual for the V65 Magna, you can see it in the drawing at the top of p. 7-13 and under the left index finger in the top photo on p. 7-23.) The protrustion acts as a "reluctor." That is, when it approaches the pulse generator, which is a coil with a magnetic core, it induces a change in the field of the magnet that in turn induces a voltage pulse in the coil. A second pulse is generated as the protrusion leaves the pulse generator. Since the generation of these pulses is strongly dependent on the distance between the reluctor and the magnet, the air gap between the protrusion and the pulse generator must be correct.
In the spark unit, the "pulse shaper" adjusts the voltage signals from the pulse generator to give a clean cutoff of current to the primary side of the coils and to compensate for variations in pulse voltage due to engine speed. The spark unit also controls advance and dwell, amplifies primary voltage to the coils, and adjusts for variations in battery and alternator voltage. Their complexity and construction are why it is not practical to test or repair them. They either work or they don't. The 1-3 unit controls the tach, so a sudden loss of power and a failed or screwy-acting tach indicates a failed 1-3 spark unit.
From the spark units to the plugs, the system is pretty conventional, except that each subsystem fires both plugs every revolution. That is, each plug fires at the top of the exhaust stroke as well as at the top of the compression stroke.
We have one report of a coil that tested good according to the tests in the Honda manual, but which tested bad at the dealer's shop. Thus, if you're having problems with firing on the 1-3 or 2-4 cylinder pair, and it isn't the spark unit, you might want to have the coil tested by the dealer or an electrical shop.
One good thing to do with wiring harnesses is to take apart every connector and clean both sets of connectors. Get a can of good contact cleaner. A small awl for releasing the clip that holds the contact in the plastic connector, a tube of silicone brake grease, a pencil eraser (the slightly abrasive kind), and a small pair of pliers. Carefully tale apart each connector and spray the dirt out with the contact cleaner. Remove each wire from the connector, clean the male blade connector with the eraser and the wash off with the contact cleaner. Only remove and clean one wire at a time. That way you won't forget where it goes back. Very carefully tighten the curl on the edges of the female connector. If there is any corrosion clean it out with a small piece of 300 grit sandpaper. The corrosion in the blade connectors is the major cause of connector meltdown. If there appears to be corrosion where the wire is crimped to the connector, you can use a small wattage soldering iron and resin core solder to solder it. Don't over cook it. Squirt a blob of high temp grease in the connector before putting it back together and you should eliminate most electrical connector related problems.
The turn signal switch, kill switch, and rear brake switch, at least, can be disassembled and cleaned as above. Be careful when disassembling, as plastic parts can break and springs fly across the garage.
Fixing a finicky ignition switch.
As reported from one SabMag list member:
There is a small circuit board inside the instrument panel. It is about
2 inches by 2 inches [ 5cm by 5 cm ] in size. There are 4 wires going to
that circuit board with the following colors:
Yellow / Blue Goes to CLOCK SET Button
Yellow / Red Goes to CLOCK SET Button
Yellow / Green Goes to CLOCK SET Button
Green / Black GROUND Wire
Note: The CLOCK SET BUTTON is located on the panel between the
handlebars. Also have Check; Lamp Reset; and Trip Reset
nearby.
There are two others wires associated with the CLOCK circuit. They are located in the plastic housing near the Clutch and choke actuator. The Sabre has a feature called Elapsed Time Clock. It can be used for timing how long it takes to get from point A to point B. For example: from mile marker 1 to mile marker 2. A switch at this housing controls whether you are in CLOCK MODE or Elapsed Time Mode. This select-switch has 3 wires going to it:
Green GROUND
Red / Blue Goes to MAIN circuit board in Instrument Cluster
Yellow / Blue Goes to MAIN circuit board in Instrument Cluster
I have a VF750S UK [ united kingdom ] Model , Colorized Wiring Schematic. It is hard to decipher the Power wires that you need identified. There appear to be a few that go into the instrument cluster and the related CLOCK circuit board.
Black / Brown appears to be a power wire as it comes from the fuse box
Yellow / Red appears to be a power wire
Red / Blue appears to be a power wire
Yellow / Black appears to be a power wire
Red is a power wire coming from the main 30A fuse
EXAMPLES: Black / Brown is a Black wire with a brown stripe
Yellow / Red is a Yellow wire with a red stripe
Red / Yellow is a Red wire with a yellow stripe
BEFORE going into the Instrument Cluster again; you may want to check
the wiring in the small electrical panel between the handlebars. Check
the wiring
for the CLOCK SET switch for good connections. Next check the wiring
in the wiring-box that is located on the left handlebar. Open it up and
check the wiring for the CLOCK and ELAPSED TIME toggling switch. Then go
into the instrument panel for a check of those wires. I think that the
Black / Brown wire might prove out to be the power wire that feeds the
clock. The Black / Brown wire feeds power to the TACH; FUEL & TEMP
UNIT; NEUTRAL LIGHT and SPEEDOMETER as well as the TRIP CLOCK circuit.
From what I can decipher; any color code with GREEN in it appears to be
a return path or GROUNDING wire. It may well be that your Clock Instrument
is toast. If power is getting to it and its' ground wire is okay......
then it simply doesn't work anymore.
TURN SIGNAL FLASHER UNIT
The exhaust system can be removed and replaced without disassembly. You'll either need a helper, or use a floor jack under the collector. For removal, leave a little space above the jack, remove the fasteners according to the manual, and wiggle the system loose while lowering the jack in stages until the system is free. To replace, first put the packing sleeves on the rear headers and smear a thin coat of graphite grease on them. Then spread the openings of the connectors on top of the collector slightly. If they are rusty shine up the insides with a wire brush or emery strip. Smear the insides with a little graphite grease. Lift the system up so the front headers are in position, being careful not to bend the gaskets, and so the connectors on the collector are carefully lined up ready to slide over the rear headers. With some jiggling and gentle upward pressure from the jack they should slide on.
If it ain't broke, don't fix it.
Exhaust system rattles not due to loose fasteners may be caused by broken welds holding the inner tubing in the double walled headers, or to loose baffles in the collector. Loose baffles apparently are one reason for the scarcity of salvageable collectors.
AFTERMARKET SYSTEMS
Holeshot lists Vortex 4-into-1 systems for Sabres, Magnas, and Interceptors. Chrome systems for Sab/Mags are $369-$389, and black ceramic finish ones are $379-$399. They are made by MAC and appear to be the same ones sold by MAC for somewhat lower prices. Dale Walker recommends installing a Dynojet Stage I kit with these systems. As of this writing, Kerker still makes a chrome 4-1 system for Magnas, which is listed by DK (over $500). Unfortunately both have noise levels >99dB and are sold for closed course (off-road) use only.
One list member who tried both systems for his Sabre reports that (1) the sound of the Kerker is better than that of the Vortex, (2) the Kerker appears to be better made, since the chrome on the Vortex system quickly yellowed, and (3) MAC apparently has stopped making the ceramic coated systems.
Slip-on replacement mufflers are available from Holeshot, DK, et al.
Unfortunately there are so many variables involved that there is no general consensus among list members as to what works best, and finding one you like is likely to involve some experimentation. Bar/fork mount models are less expensive and more easily installed than frame mounts, but have more adverse effects on stability and handling. Larger models offer more protection but more adverse effects on stability, handling, and top speed. Models that are designed, or can be adjusted, so that the airstream breaks clean from the edges, rather than churning up a lot of turbulence, will be quieter and more comfortable. Having your helmet entirely in a clean airstream will produce less noise and buffeting than having the top inch in a paint-shaker turbulent zone. Your height & posture also are factors, as is your helmet; some are quieter than others.
Getting Gold Wing-like protection may well require something so large you have to look through the plastic, which will result in at least some reduction in vision. There's always at least a little distortion, and it goes downhill from there as bugs, road grime, and scratches accumulate or if it rains.
FAX 481-4897
Snail Mail:
Gustafsson Fairing Screen
6310 US1N/PP Box 3567
St. Augustine, FL 32085
"makes a taller replacement shield for the Honda Sport Fairing. They are also the only people that I know of that sell a "stock" replacement screen. Gustafsson claims to manufacture over 1000 different kinds of windscreens..."
HONDALINE Coveted out-of-production accessory, especially for Sabres. List members that have them love them. Used parts dealers or private purchase.
Someone posted that Mike's of Salem, OR (see salvage yard list.) has some--for $1800 each, and $800 just for the lowers.
INEXPENSIVE BAR/FORK MOUNTS are available from major MO houses, most from $50 to $150, various brands such as National Cycle, Cyclear, Slip Streamer, Tracy, etc. Some list members report bracket breakage problems with Slip Streamer and other brand mounts for bikes with rectangular bars.
Several list members report using or having tried the Natl Cycle Plexistar 2. Some thought it too noisy, others like it. Appears stable to at least 80 mph. You may get less turbulence over the top with it raked way back.
The Natl Cycle Deflector Shield is small, sort of a minimalist approach, inexpensive (less than $50), easy to install, and has a wide range of adjustment. Recommended by several list members.
One list member reports that he doesn't care for the Tracy Road Warrior on his V65 Magna and does not recommend it.!
PICHLER hasn't had dealers in the US for several years, but they used to make a very fine fairing for Sabres. If you want to give it a try:
Kunststofftechnik GmbH
Lauterbachstrasse 19
Industriegebiet
D - 84307 Eggenfelden
Germany
Tel: 0 87 21 96 90 0
Fax: 0 87 21 72 14
RIFLE (800-262-1237 http://www.rifle.com/) Cruiser windshields, sporty fairings, and replacement windscreens for Hondaline fairings. We have one generally favorable report on the Rifle Superbike Fairing, which recommends the optional 18" windscreen over the stock 15" one, and one favorable report on the Sport fairing on a Sabre. Regarding the Rifle Windshield System for Sabre/CBX, "... First off, you'll have to remove more than the old windscreen from the Hondaline fairing. Also gone are the strakes which fit around the mirror mounts. The downside to this is that the two holes for the front mount of each strake are left showing when all is done. Installation is relatively straightforward - but you'll want a very skinny person to help you. About the only way inside the fairing (to mount the nuts for the backside) is through the locking compartments. It takes a very thin and long arm, and plenty of patience. Once on, fit and finish are excellent, with the only design quibble being that they chose a 'pebbled' texture for the black plastic portion. Smooth would have made far more sense."
SAENG/TA (800-868-7464). Winglets and "stealth" edging to "tune" the air pocket. One report: not impressed with either the winglets or the edging when used on a Natl Cycle Plexistar 2.
SPEC II (818-504-6364). A full frame fairing (uppers and lowers) for Sabres, $499.95, can be painted specific colors for you. No reports.
SWANEE (800-547-8237). Rather expensive Pacifico bar and frame mounts. The bar mount one has to be trimmed above the radiator.
Two frame mounts that fit both Magnas and Sabres: Aero XP ($779 base) and Classic ($695 base), several options available for each. No reports.
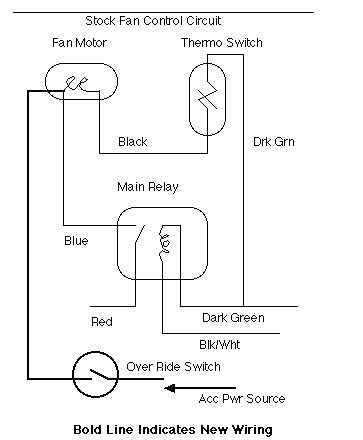
ECHLIN FS130, about $28 from NAPA. Turns on at 191-197F (ascending) and off at 182-187F (descending). The element is about 1/2" longer than the Honda one, but it screws right in and it has the two bayonet connectors found on early V4's.
One list member reports using a fanstat from a salvaged '84 Honda Accord,
and the wiring connector for it. It was stamped "92' 87'", which probably
indicates that it should turn on at 92C and off at 87C. When tested, this
was pretty close. The Accord fanstat runs two fans through a relay, so
you also need to get the relay out of the fuse box, just behind the battery
on the right fender. It is marked "Fan" on the cover. While you're there,
look around the engine compartment for a connector (with all four terminals
in it---sometimes they use a 4 wire connector with only 2 or 3 wires) that
fits onto the relay, and cut it out of the harness with about 6" tails
to work with. The bike's wiring for the fan looks like this:
| blk/blu blue black green
+----~---------=------------(M)----=-----o/o----------------> fuse plug fan motor fan stat ground |
It needs to be made into this:
| 1 3 +----~---|-------o/o-------=------(M)---=-----| fuse | %<-coil |4 2|--------%------------o/o------------|-------------> relay fan stat |
Proceed as follows:
Remove both steering head covers and the left covers of the radiator. Trace the wiring to the fan, which has a connector behind the steering head cover, and the fanstat. Remove the looming from the fanstat wiring where it goes across the frame, and from the wiring between the fuse and wiring harness. Cut the black/blue wire between the fuse and the fan connector. Strip both ends and install female blade connectors on both, with a 3" piece of stranded wire siamesed in with the one from the fuse. Put a connector on the end of the 3" piece as well. The two connectors are #s 1 and 2 above, while the connector on the end toward the plug is # 3. Cut the black wire from the fan connector and "leech" it onto the green wire from the fanstat, either by soldering or with a self stripping wire connector--connection 4. Cut the black wire from the fan stat and install another female wire connector on it--connection 5. The relay will be marked with symbols like this: -|/|- for the coil, terminations 2 and 5, and something like this: -o/o- , which are the relay contacts, #s 3 and 4. If you find a 3 terminal relay, the connection between 1 and 2 is internal, and you will not need the siamesed wire. Other relays may have 4 or 5 terminals, but 2 of them may be marked "NO" and "NC". Use the "NO" contact as # 4, and insulate the "NC" contact, as it will be hot when the fan stat is open (cold).
Brand name: GP Sorenson
Part Number: 40-5001
Price: $14.99 (Advance Auto Parts- prices may vary from state to state.)
Thread pitch: M16 X 1.5
Normally open
Closes at 189 to 199 degrees F
Opens at 181 to 171 degrees F
This switch is the direct equivalant to the NAPA #FS130
This switch fits many Honda car applications,
1975-1991 Honda Civic All 3 door(hatchback) and CRX models
also 1986-1991 Acura Integra, all engine sizes.
For additional information on installing a fanstat, especially those with single-connector OEM fanstats.
K&N and Uni sell alternatives to the Honda units. (The paper elements for Magnas are expensive.) Only two reports on the Uni, one recommends it and the other does not. Many list members like the K&N (in one case after using one on a V65 Magna for 80K miles), but for a dissenting point of view based on oil analyses, see Brian L. Sydness's oil test document.
An inexpensive unit that is a close replacement for the Honda one is available from DK and may be found in auto supply stores. Some Honda dealers also carry them.
You can find alternatives that are a lot cheaper and that fit on the bike, but unless you verify the flow rate and bypass pressure, you're on your own. See http://math.uwaterloo.ca/~rblander/oil_filters.txt for further information.
Also, from another list member:
Wix now has a bonafide list of motorcycle models and related oil filters. The 1334 which was for the VFR is now for the VF/VFR's thru 1986. The Wix filter for the 90-current model VFR is 1358. The price is about half ($5.50 US) and readily available.
The K&N Magna handlebars, if you are mechanically inclined, should go on without much difficulty in a few hours of your time. If you go any larger, you will definitely have to modify your cables, including Both throttles, choke, clutch line, and at least your upper front brake line. The cable modification is not that difficult a task. Flanders Co. in California was very helpful and informative, and they have a free catalog. Flanders can be reached at 800-423-4483."
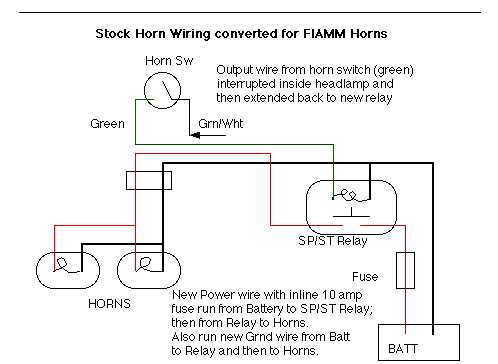
MO houses sell louder horns, but Fiamms in particular are highly regarded, and several list members highly recommend them. They can be found at auto supply stores, although some searching may be required, or a dealer may be able to order them for you. Installation is easiest with a kit that includes the relay, fuse, and instructions. If you can't find one, you can get a suitable 30A relay and a 20A inline fuse at an auto supply store. The circuits are
An alternative to Honda hoses is 7/8" heater hose, if you can find it. This will serve for the straight ones, but the ones on the water pump are too sharply bent.
Use bulk hose of the correct size. Honda dealers carry metric hose; it is a little expensive, but $10-$15 worth is enough to completely replace the fuel and breather hoses. We have one report that the large hose between the main and reserve tanks can be replaced with 3/4" heater hose with a piece of smaller hose inside to keep it from kinking. Our advice is that if you're going to try this make sure the hose is neoprene. Some compounds don't stand up to gasoline. [We don't recommend using hose not specifically labeled for fuel use.]
WATTAGE Increased wattage bulbs are popular, from 100w/55w on up; at least a couple of list members use 130/90s. Sold by DK, Chaparral, etc. No problems with wiring, burnt reflectors, or tickets are reported. [High-wattage bulbs are illegal in many places, if you care.]
FAILURE If the headlight fails to come on either high or low beam, check for voltage at the starter switch terminal to the headlight. (The starter switch turns off the headlight while cranking.) Dirty contacts are fairly common; treat with electrical contact cleaner. If this fails, you can try disassembling the switch and polishing the contacts with crocus cloth, but you may have to buy an entire starter/kill switch assembly, since the individual switches aren't sold separately.
First, check the bulb. If it's good, the problem commonly is worn or dirty contacts in the ignition switch, which has separate circuits for the taillight and main power. Verify with a VOM. Treat by disassembling the switch (watch out for the springs) and cleaning with contact cleaner. Polish the contacts with crocus cloth if corroded. If a replacement switch is needed, you can get an alternative part from DK and probably other MO houses as well for much less than the Honda part. Disadvantage is that you would then need 2 keys.
Eclipse products (MO houses) are recommended by several list members. Others have leather bags and put the contents in garbage bags for rain protection. Rider Wearhouse (800-222-1994) has some waterproof soft saddlebags, and some other good luggage, too. We have one report concerning unsatisfactory service from Capital Cycle, importers of GIVI hard bags. Also, the mounting kit is described as "just adequate," with the list member advising that he'd fabricate his own next time.
Solely a custom fabrication proposition as far as we know. See STANDOFF.GIF for one way to do it on a Magna.
From one list member: "...Sacs...are made for Harleys, but work great on any Magna with a sissy bar. Being a Harley accessory, they're not too cheap, but they've been well worth the expense... There are two bags... The larger one is about $130 and the small one is about $80. ... Each bag has a flap that fits over the sissy bar, and straps which wrap around the rear turn signals to anchor it down. If you ride alone, the bag sits on the passenger seat; with a passenger, it hangs off the back. The smaller bag is about the size of a small duffle bag, and has a Velcro-in plastic bag for ice, so it doubles as a cooler for picnics. It's great for tooling around town & running errands, and can be strapped on top of the larger bag. The larger bag is the size of a large backpack, and the tie-down straps convert to shoulder straps once you get off the bike. It's great for when you don't want to leave all your gear on your bike, and don't have anywhere to stash your bags, like on camping trips, which is exactly what I wanted the bags for. Also, without a passenger, the large bag makes a great full-size backrest. The bags are very sturdy--nylon around what feels like neoprene foam.
There is a competing product called T-bags, which I was thinking about getting when I first looked into this type of bag. The T-bags do have some advantages: They're cheaper (about $130 for a model similar to the two Sacs combined). They have a model specifically made for Magnas, whereas the Sacs are specifically for Hogs, and don't fit perfectly. They seem to have more pockets and compartments. Sacs have one big compartment and a few small map-type Velcro pockets on the outside. Disadvantages: T-Bags are made from a thinner material and don't seem as sturdy. They have lots of straps to flap around, where the sacs only have the tie-down straps. No cooler capability, as far as I'm aware. All in all, I'm very happy with the Sacs, and use them much more than I use my saddlebags.
Another nice thing is that, since they hang off the sissy bar, they can be used along with saddlebags (and a tank bag, if you really need that much gear) for long trips with a passenger."
From another list member: Rev-Pak (800-766-2461) makes "generic" tailbags that fit over most sissy bars and cinch in place with straps. (They also have some other neat luggage.) They have one large and one small zippered compartments, rings for additional attachments, soft fabric on the bottom, and a carrying handle.
They are rather simple affairs but not very expensive and come with raincovers. The smaller of the two ($60) is about the size of a student backpack. It is fine for a modest amount of gear.
These are also available from Whitehorse Press (800-531-1133), usually with less wait than from Rev-Pak.
Eclipse tank bags also are favored by many. Also, from one list member: "Let me put my vote in for a bag that doesn't get much press: the Fox. They make two, the Sport Shuttle and the one I own. ... The Sport Shuttle...[has] one main compartment with...lots of room and [is] recommended for the $40.00 asking price. ...
[T]he larger tankbag, ...$70, ...I highly recommend...Lots of room, expandable, and it has three small pockets on the sides and rear of the bag. For scratch prevention, it rides on a large neoprene pad. Uses a standard three-point mounting. ...I couldn't be happier with another bag than the Fox. ...I would challenge Eclipse to beat the Fox bag. This coming from a guy riding 13-15K mi./yr, both vacation trips and daily trips to client sites."
We have one favorable recommendation for RKA tankbags
(800-349-1752).
For waterproof gear bags and other camping gear, look into offerings by Rider Wearhouse (800-222-1994) and camping suppliers such as:
Dennis Kirk (800-328-9280) has good service, but their prices tend to be a little higher, They will match others' prices on certain items only, and only if you ask.
Several other MO houses (see advertisements in any motorcycle magazine) get mixed reviews for service.
Recommends adjustment of the rear brake pedal to 1/4" below the footpeg (p. 35). The correct adjustment is 1/4" above the footpeg.
Periodic oil analyses are a good way to monitor for abnormal engine wear.
Sources:
Detect Auto Labs, Inc.
280 Park Avenue South, Suite 9G
New York, NY 10010
Least expensive ($5-$10); sometimes found in large auto super stores; does not list previous samples; always suggest that you change the oil, regardless of condition.
Lubricant Consultants, Inc.
350 E. Churchman Ave.
Beech Grove, IN 46107
(317) 783-2968
Around $10/test, sample kit a few bucks more; provides a history of tests; good for looking at trends.
Cleveland Technical Center
18419 Euclid Avenue
Cleveland, OH 44112-1016
(800) 726-5400
Provide history of tests and contact you by telephone if they discover a problem; $6 for a sample kit (3 samples), $8 for the actual test. You can buy the kits directly. Results from all three labs are reported to be reasonably close for the same sample.
Almost everybody uses synthetic or a synthetic/petroleum blend. See oil FAQ. Change intervals are frequent, every 3000 miles for most list members. For an alternative view see the oil test document. FWIW one list member relates that Megacycle does not recommend Golden Spectro oils, saying they don't provide enough protection for the cams and followers. They do recommend Kendall, Red-Line, Motul, and Honda.
Some list members have oil pressure gauges permanently installed. See GAUGES.TXT, GAUGES.GIF, and ADAPTER.GIF for a good-looking installation and instructions.
Cost is $3.00 each plus .50 per order for postage. If you live outside the US, add $1.00 for postage.
Brian Sydness
PSC 3 Box 4227
APO AP 96266
WCC Wholesale Parts 1-800-438-7921
$5.00 on Honda and $2.00 all others plus shipping.
NEW
Banzai Parts (800-405-7283)
Crazy Caton's Discount Parts (800-745-2453)
Cycle Parts Discounters (410-944-1000)
Daytona Motorcycle, Ltd. (604-588-4988) (British Columbia)
Discount Honda Parts (800-669-2275) Discount Parts
(800-552-5550) Honda parts warehouse (800-636-1140)* Internet
Motorcycle parts (http://205.162.162.100:443/index.htm)
You have to know the P/N before calling.
Midwest Action Cycle (800-343-9065)*
MR Cycles, Inc. (800-359-0567)
San Diego's House of Motorcycles (800-286-5871)
http://www.sdmotorcycles.com Also general supplies.
WCC Wholesale Parts (800-438-7921)
*recommended by at least one list member
See salvage list. Motorcycle Shopper also publishes a boneyard list:
1997 Motorcycle Salvage Yard Directory
Motorcycle Shopper, Dec 1996
or, $4 from
Motorcycle Shopper
Attn: 1997 Salvage Yard Directory
1353 Herndone Ave.
Deltona, FL 32725-9046
407-860-1989
Also, there is a boneyard list at http://percival.xyz.com/st1100.
Another to check out: http://anvil-group.com/yards/bike.htm
And yet more:
Salvage Yard Network - http://motodealer.com/network/
Several companies sell hose and fittings suitable for brake lines and oil mods, as well as a great variety of fasteners and other products.
(1) Flanders Co. (catalog not available until 1997)
Box 93605
Pasadena CA 91109
800-423-4438
(2) McMaster-Carr (908-329-3200)(hardware supplier)
| V45 Magna | V45 Sabre | V65 Magna | V65 Sabre | |
| Power, bhp @ rpm: | 80.3 @ 9500 | 80.3 @ 9500 | 116 @ 9500 | 93.7 (CW dyno) |
| Torque, lb-ft @ rpm: | 46.2 @ 8000 | 46.2 @ 8000 | 70 @ 7500 | 62.5 (CW dyno) |
| Test wt, lb: | 518 | 525 | 579 | 594 |
| 1/4 mile, sec @ mph: | 12.08 @ 108.82 | 12.16 @ 108.43 | 11.07 @ 123.62 | 11.38@ 120.36 |
| Top speed (1/2 mi): | 122 mph | 123 | 137 mph | 139 mph |
| MPG: | 46 | 49.5 | 39 | |
| Range to reserve, mi: | 120 | 183 | 144 | 207 |
Acceleration (seconds)
| V45 Magna | V45 Sabre | V65 Magna | V65 Sabre | |
| 0-30: | 1.8 | 1.8 | 1.8 | 1.5 |
| 0-40: | 2.7 | 2.7 | 2.6 | 2.0 |
| 0-50: | 3.6 | 3.6 | 3.4 | 2.7 |
| 0-60: | 4.6 | 4.6 | 4.3 | 3.3 |
| 0-70: | 5.5 | 5.5 | 5.2 | 4.1 |
| 0-80: | 6.6 | 6.6 | 6.1 | 4.9 |
| 0-90: | 7.8 | 7.8 | 7.0 | 6.0 |
| 0-100: | 9.6 | 9.7 | 8.3 | 7.3 |
Top gear (seconds)
| V45 Magna | V45 Sabre | V65 Magna | V65 Sabre | |
| 40-60: | 4.8 | 5.0 | 4.2 | 3.7 |
| 60-80: | 5.5 | 5.7 | 3.6 | 3.9 |
Calculated max. speed in gears, mph
| V45 Magna | V45 Sabre | V65 Magna | V65 Sabre | |
| 1st: | 48 | 51 | 57 | 58 |
| 2nd: | 68 | 72 | 80 | 82 |
| 3rd: | 85 | 90 | 100 | 103 |
| 4th: | 103 | 109 | 121 | 124 |
| 5th: | 123 | 130 | 145 | 148 |
| 6th: | 147 | 156 | 173 | 177 |
Speedometer error
| V45 Magna | V45 Sabre | V65 Magna | V65 Sabre | |
| 30 mph indicated: | 28 | 29 | 29 | 30 |
| 60 mph indicated: | 57 | 58 | 56 | 58 |
Braking distance, ft
| V45 Magna | V45 Sabre | V65 Magna | V65 Sabre | |
| from 30 mph: | 27 | 30 | 29 | 30 |
| from 60 mph: | 125 | 119 | 117 | 127 |
1/4 mile: 11.38 sec @ 120.36 mph
Top speed in 1/2 mile: 139 mph
From Cycle July '84
1/4 mile: 11.20 @ 121.69
From Cycle Guide June '84 "Quickest, Fastest Shootout"
| Bike | 1/4 mile time @ speed | Top speed |
| Yamaha FJ1100 | 10.681 @ 125.34 | 145.9550 |
| Suzuki GS1150ES | 10.742 @ 124.13 | 142.6200 |
| Kawasaki Ninja 908 | 10.831 @ 124.65 | 145.3710 |
| Honda VF1000F | 10.834 @ 125.69 | 146.8187 |
| Honda V65 Sabre | 10.857 @ 125.00 | 140.6250 |
| Kawasaki 750 Turbo | 10.944 @ 122.11 | 143.3121 |
| Kawasaki GPZ1100 | 11.016 @ 120.80 | 138.4615 |
From Cycle May '85 "Horsepower Shootout" (dyno measured)
| Bike | 1/4 mile time @ mph | Bhp @ rpm | Torque @ rpm |
| Suzuki GS1100EF | 10.81 @ 124.44 | 101.00 @ 9000 | 65.11 @ 7500 |
| Yamaha V-Max | 10.99 @ 124.04 | 119.08 @ 9000 | 77.54 @ 6000 |
| Yamaha FJ1100 | 10.99 @ 122.34 | 98.24 @ 9000 | 61.41 @ 7500 |
| Kawasaki ZL900 | 11.07 @ 123.25 | 90.50 @ 9000 | 56.64 @ 8000 |
| Kawasaki ZX900R | 11.08 @ 125.17 | 94.16 @ 10500 | 55.33 @ 8500 |
| Kawasaki ZX750 turbo | 11.13 @ 120.32 | 90.02 @ 9500 | 65.1 @ 5000 |
| Honda VF1100S | 11.23 @ 122.61 | 93.70 @ 9000 | 62.60 @ 7000 |
Reportedly fits perfectly.
Get a photocopied set of reviews for US$16 from:
Motorcycle Reports
Ian Smith Information
PO Box 9440
Denver, CO, 80209-9440
iamsmitty@aol.com
http://www.webgraphic.com/isi/
MUSTANG (800-243-1392). Mustang makes seats for Magnas, but not Sabres. They are softer than the Corbin and a couple of LMs who have tried both say they are more comfortable than the Corbin:
There are two basic types, a wide touring saddle and a narrower squareback design. This from one list member who likes the narrow version: "It...sits a little lower, and IMO (and the female passengers') is a lot more comfortable than a Corbin. I have both, but now exclusively ride with the Mustang. It cost (back in late 1992) about $189, and the touring version cost about $199. I am still riding with it, and I have put over 60,000 hard miles on it between both bikes. ...The narrow, cruiser style seat sits a little lower than stock, about 1 to 2", but I have never measured it. I think one of the reasons that a person sits lower is the fact that it is narrow in the proper places. When you put your legs down at a stop, they do not have a tendency to spread apart, as in the stock or Corbin seat. Your legs actually rub against and hug the side panels."
MAYER
916-246-7521
625 Eastridge Rd.
Redding, CA 96001
Vinyl double seat $250
Solo vinyl seat $195
Leather add $125
California residents pay sales tax.
Send in your original seat pan. You must also take three photographs with the bike off the center stand and supported by someone. #1 is with both rider and passenger, #2 solo rider, and #3 an oblique photo. It's best if the photo shows the left shoulder of the rider and the ground. Have the cameral positioned directly opposite the rider for the first two photos and then take two steps to the right for the oblique photo. When the photos are ready, call Mayer and set up the time to send in your seat pan. If you live in California return ups is free, out of state you pay UPS.
DIAMOND CUSTOM SEATS (712-347-5316) makes seats custom built for each individual rider, and for "almost any model of bike." (MT&T 11/96 p. 54) No reports.
TRAVELCADE (800-397-7709; http://www.saddlemen.com) makes seats for Magnas, at least. Available from DK.
Report from a list member:
They were available from DK. I got mine (cover only) from J.C. Whitney. It staples on, can be done in about an hour, and is excellent. I got the wide butt touring bucket, 'cos I'm getting older and my wide butt needs it.
UTOPIA
www..inb.net/utopia
330-666-2602.
Rebuilds only. They have a standard price of $65 for refoam of stock seat. They also do some upgrading\customizing.
From one listmember:
"I had them do the seat on my gold wing last year. Not as good as the Russel seat I had on my '76 wing, but acceptable at one fifth the price."
SARGENT CYCLE (800-749-7328). Anyone interested in a custom seat alternative to Corbin or Mustang or in just getting an old seat fixed should check them out. They advertise a 2 day turnaround and a wide variety of custom covering and fitting options. Prices look reasonable, e.g., $69.95 basic recovering charge. Claim to be able to lower seats, too.
One list member reports on Sargent:
I sent off my very shabby 1982 magna seat. I got it back the other day <and> it looked fabulous. I had the front part lowered about 2 inches sloped towards the backrest. So you actually sit down into the seat, very comfy. I had the passenger area sculpted a bit to. I had it slope down a little towards the rear before it dips back up. I was tired of my girlfriend sliding forward into me every time I got energetic with the brakes. They put a nice button fit cover on it, and completeley redid my backrest pad to match. Very sharp. I highly reccommend them. Total job was about $160. Its generally cheaper if you dont have custom foam sculpting.
As far as the seat goes, I always felt the stock foam was too flat, and had kind of a ridge in the middle that you had to straddle. I always wanted to sit down into the seat so it could hold my weight, without having to use my lower back muscles. I weigh about 210 and Im 6'1". So Im a pretty big guy. After the Sargent modifications the seat is as I thought it should be. I drew them a little diagram, and had a couple of phone calls with them, and they did a good job. They wanted to replace all the foam because I guess mine was a little worn out, but I didn't feel like spending the extra money. What they do though is if you order the button fit cover they put a fresh layer of foam on top of the stock foam, to give it sort of a cushy look. It also makes the seat real soft.
RUSSELL
One list members report on Russell:
Russell Cycle Products *will* build one of their "DayLong" saddles just
the way you want it (rider backrest, please) and will build each half of
the seat to suit you and your rider!! Cost is slightly higher than the
Corbin (approx. $300), and the wait is about 6 weeks, but Iron Butt
participants swear by these seats. I'll be ordering one soon.
Russell Cycle Products, Inc.
3rd & Main, PO Box 609
Fall River Mills, CA 96028
http://www.he.net/~wsm/index.html
Warm Springs Motorcycle Seat Upholstery
2060 Warm Springs Court, Suite #5
Fremont, CA 94539
800.763.9732
"After trying epoxy alone twice on a broken tab, I tried the following and the tab hasn't broken since. First, I thoroughly cleaned all the old epoxy off the base and the tab. Then I used the point of a 3-cornered file to roughen the hollow area under the tab. I used Loctite #82565, 'Plastix Advanced Plastic Bonder,' to attach the tab. This product is a Super Glue type glue with an 'activator' that you brush on the edges to be joined immediately before applying the glue. Then I filled the hollow area under the tab with epoxy putty; I don't recall the brand but JB Weld or any similar product should work."
Q: I am the owner of a 1985 Honda V65 Sabre with a starter motor that is going bad. I spoke with my local dealer, who shocked me with the price of a new starter-approximately $300! When I asked about getting it rebuilt, they did not recommend it, stating that rebuilt starters do not last. I do not need a starter that will last another 13 years, but a couple of years would be nice. Do you have any recommendations on this and if so, do you know who can do the rebuild?
A: I recommend that you or a competent friend do the re-build. If you can change the oil and filter on your bike, you can repair the starter motor. It's not that difficult, and besides-what do you have to lose? With a lot of bikes, just getting the starter out can be a nightmare. In the case of the V-four Honda it's a snap, as it's held to the front of the engine with two 6mm bolts, and if it takes you more than two minutes to pull it out, you're dragging your feet. Don't worry about the hole in the crankcase it slides into-no oil is going to run out. Here's the one great truth about all motorcycle starter motors: they're all shockingly expensive. What's more, few parts are available separately for them, and in some models, none at all. Compared to some, that $300 you were quoted is a bargain. However, most manufacturers at least offer a carbon brush-plate assembly, because that's the item that usually wears out.
For the V65 the part number's 31206-VM5-008. It sells for about $16. Your bike's starter is held together by two long Phillips screws joining caps at either end to the outer casing. Before disassembly, I recommend making reference marks where the end caps join the casing, because theyr only go back together one way and finding that one way can take ages. Fingernail polish or scratch marks will make reassembly much easier. Gently tap or pry off the end caps-stay after it, they will come off. In each end cap is a small bearing that supports the spinning armature. Make careful note of any shims or thrust washers stuck to these bearings with old grease or carbon dust. Lay everything out in the order it came apart. Now blast all components squeaky clean with brake or electrical cleaner for a thorough examination. Worn out brushes will be obvious. You might even find a cracked soldered connection as the cause of your woes everything in a starter motor is pretty simple, except for the armature. It can have a broken internal winding that's impossible to see, so run it over to your local automotive machine shop or starter motor repair facility for testing. If they give it the thumbs up, have them chuck the armature in a lathe to dress down the end that the carbon brushes ride on, because it will be hour-glass-shaped. If all of this work costs you more than $10 I'd be surprised. Solder in the new brush plate and lightly grease the inner race of the end-cap bearings. If two small planetary gears are employed in one end cap, grease them, too. Reassemble everything and test the starter on the bench with jumper cables and your bike's battery. Attach the negative cable to the body of the starter and the positive cable to the hot input post. Don't be alarmed by a few sparks as you touch the post-just make sure nothing combustible (including the battery) is nearby The starter motor should rock and spin hard when 12 volts are directly applied to it. No, a rebuilt starter motor won't last like a new one. But for less than US$30 and an afternoon's work it will last long enough.
Rider / April 1998
| 1. Wash, dry, and wax the bike thoroughly. |
| 2. Drain the coolant, flush the system, and add new coolant. |
| 3. Put some gas stabilizer in the tank (available at auto part stores). Also make sure the tank is as full as possible. |
| 4. Ride the bike until it's warmed up. |
| 5. Change the oil and filter. |
| 6. Lube the chain. (Shafties take a break.) |
| 7. Turn off the fuel petcock. |
| 8. Drain the carb fuel bowls. |
| 9. Remove the air filter. |
| 10. Remove the spark plugs. Inject a small amount of 2-stroke oil into each cylinder. Crank the motor a few times. List members question the value of spraying WD-40 into the air intakes. |
| 11. Replace the spark plugs and air filter. |
| 12. Seal the air intakes with duct tape to keep out mice etc. |
| 13. Remove the battery and put it on a trickle charger in a warm place. |
| 14. Put the bike on the centerstand and block it up so the front tire also is off the ground. |
| 15. Spray some WD40 into the exhaust pipes. This absorbs water and puts a nice oil coating on the insides of the exhaust system. ONLY do this AFTER the pipes are cool to the touch. |
| 16. Seal the ends of the mufflers with plastic bags. |
| 17. Put some silicon preservative on a rag and wipe down all the rubber pieces except for the grips, pegs, and tires. |
| 18. Lube all cables and moving gizmos like foot pegs, levers, etc. |
| 19. Bleed the brakes and clutch. |
| 20. Cover with a breathable cover. Honda suggests that if the bike is going to be in storage for more then 4 months, you change the oil again when you get it out. If you do that, you might as well put cheap oil in for the winter, and replace it in the spring with good oil. (Some list members think this is a waste.) No reason to change the oil filter twice though. |
Favorable report: the Pocket Pump/Gauge by Richter Performance, which has an aluminum body with an attached gauge and a hose with a screw-on Schrader valve fitting on the end. The aluminum body has a little plunger you press to bleed off air. You have a choice of interchangeable pumps that attach to the aluminum body. The pumps are basically plastic syringes of various sizes.
The fork brace is somewhat flimsy and tends to crack or break through the bolt holes, especially on V65s and most especially on V65 Magnas.
Holeshot lists a SuperBrace replacement (catalog number SB-2245, V65 Magna 1983-1986, $99.95), but as of this writing they are on indefinite backorder. Apparently the manufacturer has changed ownership and is having production problems.
SuperBrace fork brace
STD Enterprises, Inc.
Motorcycle Division
5701 Engineer Dr.
Huntington Beach, CA 92649
800-322-4783
A few list members have gotten a machinist to make a brace from 3/8" or so T-6061 aluminum plate, using the old one as a template. You could do this yourself by marking the holes with a transfer punch and drilling the holes in a drill press. Cutting and shaping could be done with a band saw or scroll saw, or by hand with the appropriate tools.
Snap ring pliers are a must for changing fork seals. It's hard enough with snap ring pliers, after the rings have reacted with the aluminum to weld themselves to the ring groove.
You'll also need a seal driver, but you don't have to pay $29.95 at your local Honda dealer for a specialized tool you'll seldom use. Go to your local hardware superstore and get a piece of 1 1/2" PVC pipe. They'll sell you about 4 feet more than you need, but it's cheap and you can cut off the right amount with a hacksaw. This only works with the 39mm forks of the V45s. V65s have 41mm forks. For these, get a piece of 2" PVC and a 1 1/2" coupler.
Grind or rasp the coupler down so it will fit inside the fork body and cut a piece of the 2" pipe to use on top of that.
There is one report that the pro-moly seals from Leakproof have a tendency to leak, and that stock ones from Honda are better.
Also see Motorcyclist 12/95 p. 72.
Several list members have tweaked their suspensions to improve ride and/or handling, and/or to lower the ride height (of V65 Magnas). One reports a modest approach with a V65 Magna that decreases ride harshness somewhat without adversely affecting handling: For the front, Progressive Suspension springs, with spacers cut so as to duplicate stock preload and ride height; 10w fork oil at the stock level; and 0 psi fork air pressure.
For the rear, Progressive Suspension 17000 shocks and standard weight springs. Be sure to check whether the shocks are being sold with springs assembled. If not, you will need a compression tool to assemble them.
At least a couple of list members have lowered their V65 Magnas and have provided details. In one case, the front suspension was lowered by by 2" and the rear by around 1". The front was lowered by putting spacers in the front fork where the top out spring sits. This requires disassembling the front fork to insert the spacers. The only thing that this modification affects, besides the height, is the maximum travel of the fork, but the Magna has a lot of travel to begin with. (Sliding the forks up in the triple clamp would render the air adjustability useless.)
The rear was lowered by installing shorter shocks. According to Progressive Suspension, there is a 1.2:1 ratio between the shock height and the actual lowering of the bike. The stock shocks are about 14.25" in length. A 13.5" length was used, but 13.0" probably would have been better. Even two up, at full braking & full load, neither the front forks nor the rear shocks bottom out, and speed and performance, even on the track, are very satisfactory.
In the other case, the front was lowered by raising the forks 10 mm in the triple clamps, whereas the rear was left stock height.
Users of the narrow Mustang seat report that they make the bike feel lower.
Custom shocks of various grades and lengths also are available from Ohlins (Noleen Racing, 619-246-5000) and Works Performance (818-701-1010). [Anyone tried any of these?]
See http://math.uwaterloo.ca/~rblander/V4_works.txt for a Robyn Landers's review of Works Performance suspension modifications on his V45 Sabre.
NOTE: Be careful fooling around with your suspension. Unless you know what you're doing, get some help or get a mechanic to work on it. If you don't know why, see Tony Donsisi's suspension disaster.
If the steering head bearings need servicing, consider replacing ball bearings with roller bearings if your bike doesn't already have them. One list member reports that the bearings cost about $50. Follow the manual to remove the forks, take apart the stem, drive off the old bearings, and tap in the new bearings. This can take some patience, as they can be stuck tight. You will need a drift to remove the lower race from the stem (it has to go around a bend). One LM reports that a car tire iron works. Also see Motorcyclist 11/96 p. 78.
You can install a grease fitting while you have the stem apart. Find a spot near the top of the stem and below the top bearing which does not interfere with cables, wires, etc. and can be reached with the drill and grease gun. Drill and tap the hole and install the zerk fitting. Grease the bearings, assemble the stem, adjust the bearings, and use the grease gun to fill the stem with grease. Stop when grease starts oozing out of the bearings. Wipe off the excess and reassemble.
Some V65s appear to suffer from a wobble or weave under certain high-demand conditions, especially high-speed (>=90 mph) sweepers. This appears to be inherent and probably is due to flexing of forks, frame, or both. Wobble under other conditions indicates that repairs or adjustments are needed somewhere.
Diagnosis is as follows:
| Bar | Temp C/F | Conditions |
| 1 | 46/115 | Warm-Up |
| 2 | 54/129 | Warm-Up |
| 3 | 72/162 | Warm-up, highway speed |
| 4 | 93/199 | City speeds, some stops |
| 5 | 102/216 | Heavy traffic, fan off/on |
| 6 | 115/239 | Only balancing carbs, fan off/on |
| 7 | 130/266 | Replace fan switch |
Tire sizes are indicated by number/letter combinations such as 140/90-H16, meaning 140 mm wide, 90% as high as it is wide, and fits a 16" rim. The letter is the rating according to highest continuous speed (S = 112 mph, H = 130 mph, V = 149 mph, and Z = over 149 mph). M_ sizes are American sizes; for example an MR90-18 71H is equivalent to a 120/90-18, and an MU90-16 78H tire is equivalent to a 140-90/16. You don't see these much anymore.
Tires also have a pressure rating molded into the sidewall. This is the MAXIMUM tire pressure, not the recommended pressure. The recommended pressure will be given in the owner's manual and will also be on a decal on the swingarm or under the seat or someplace. The recommended pressure is a guideline based on an average load and riding style. Heavier loads, uh, "spirited" riding, or different tires may require a slightly higher than recommended pressure. Don't use less than the recommended pressure, since this could lead to excessive heat buildup due to increased flexing, which can lead to tire failure.
UNDER NO CIRCUMSTANCES EXCEED THE MAXIMUM PRESSURE!
Metzelers appear to be the overwhelming favorite; ME33 Lazer, either regular or Comp K compound, on the front, and either ME99A Perfect or ME55 Metronic on the rear. Bridgestone S11s are reported superior to Dunlop K591s in both traction and mileage, although the K591s appear to be somewhat superior to some of the stock tires.
At least two owners of V65 Magnas (one '84 and one '85) have installed ME99As in 150/80-16, 10 mm wider than the stock 140/90-16, with no clearance problems and no significant change in rpm/mph ratio. The tight spot is the brake torque arm, and with this tire there is about 1/8" clearance. Don't try to use a wider tire on the front. Some 120s will fit (barely), but the bike will handle like a pig.
It is true, in general, that radials require a wider rim. It is also true that at the time the Magna and Sabre were produced, radials were not readily available. Radial tires, however, due to their design, have a range of rim widths that they will fit, as recommended by the manufacturer. In each company's catalog is the recommended rim width for each tire. The 150-80ZR16 radial, from Metzeler, Michelin, and Pirelli, (and also the Sportmax, when they made them), according to the factory catalogs, can be used on the rear of the Magna, and 110/80-18s can be used on the front. One list member has been using radials for 30,000+ trouble free miles on the V65 Magna, and recommends them highly.
To order free motorcycle tire catalogs the numbers are:
We have a report that Battlax BT-17s are superior to Metzeler bias ply tires on a VF1000F.
JC Whitney features the following:
COMPRESSION TESTER for *all* motorcycles
Includes 10mm, *12mm*, and 14mm long reach adaptors....
P/N 14AJ7807N $27.95 Page 35, catalog #76J
You can check lateral wheel runout with the wheels on the bike, as long as the wheel bearings are tight. A quick check can be made without a dial indicator by clamping a soft lead pencil to the fork or swingarm so the point just barely touches the rim, then rotating the wheel and carefully observing the pencil point. If there is any significant runout you will be able to see it. You can also use a dial indicator similarly.
BLISTERING CHROME ON MAGNA WHEELS
This is a fairly common problem. On the outside it's just cosmetic but it's not unusual for it to get bad enough on the bead sealing areas to cause chronic leaks.
Possible solutions are:
As related on Robyn Landers's web site, some later engines had the cam bearings line bored. These can be identified by half-circle plugs in the heads where the boring tool went in. Clearances on these engines are tighter so supposedly you don't need the special tool to adjust valve clearances.
You can check out valve noise with an automotive stethoscope, or the poor man's substitute: a long screwdriver held with the tip pressed into the hex socket in the head of the rocker shaft and the other end pressed against your ear.
THE DAVE DODGE METHOD OF VALVE ADJUSTMENT
http://penn.com/~pwr/sm-links.html
The SabMag High-Tech & Customization Page
http://www2.xtdl.com/~tonyd/magna/mcpage.htm
Art Reitsma (Art's Tierney-Hollen type oil mod, cam regrinding FAQ)
http://www.island.net/~areitsma/
Bob's V45 Magna Page (reviews, links)
http://www.cyberspc.mb.ca/~rsunley/
Brian's Oil System Modification (Brian Sydness, the tubing wizard)
http://www.cyberspc.mb.ca/~rsunley/briansoil.html
Robyn Landers (Keeper of the V4)
http://math.uwaterloo.ca/~rblander/moto.html
SabMag East events (Deals Gap, etc.)
http://home.sprynet.com/sprynet/mstewart/
The Sabre/Magna Gallery (bikes, riders, SabMag West events)
http://www2.cdepot.net/~tcwild/sabmag.htm
One list member's take on it:
Mike Stewart (Iron Mike) - King of the SabMag list, defender of the wrench, almanack of the mechanical, rider of the IBR. Will tolerate ijits to a point, then scathingly refers them to FAQ. Also keeper of FAQ.
Jude Federspiel - High Priest (runs the listserver). Dissappears on long, noposting journeys, only return and post again. Sort of functions like deus-ex-machina, will usually step in to nuke transgressors when things get out of hand.
Ye Wilde Ryder - Knight-Errant and Grand Exalted Poobah (Grand Exhausted Rooster?) of SabMag. Has owned more bikes than most dealers, known to roost on little notice. Occasionally fills in for D.R. when lunatics, cretins, and morons post.
David Ryder - Court Jester, flamer of newbies, promalgumator of electronic assault and battery on the uninformed. If YWR is Don Quixote to this list, then D.R. is Sancho Panza. ;-)
Milt Oberman - Poet Lauerate of SabMag, Legal Advisor, and Cartographer. Straight man for Ryder.
??michael - Resident Artiste of SabMag, also official obscure music advisor, counterculture expert, and stalking horse for Ye and Mike.